I recently undertook a conversion on our 2008 Roadtrek 190 Popular, swapping out the original fluorescent light bulbs for LED bulbs. Now, this might sound simple, as in remove one bulb and install another. But when you’re changing from fluorescent to LED, you aren’t just changing the type of bulbs but the way they are powered, as well.
Fluorescent bulbs are powered through a “ballast.” This ballast regulates the current to the lamps and provides sufficient voltage to start them. But an LED bulb uses a “driver.” This driver responds to the changing needs of the bulb, providing a constant quantity of power to the LEDs.
I have been thinking about doing this conversion for some time because we like to boondock and anything that can cut back on battery use is a good thing. In this case, I knew LED bulbs should draw less power than fluorescent bulbs, but I wasn’t interested in changing out the fixtures.
There are several ways to do this type of conversion, but I decided to go with what I think is the cleanest look closest to factory installation. And that involved removing the fixtures, taking out the fluorescent ballast and replacing it with LED drivers before reinstalling the fixtures.
Each tube light kit from M4 comes with the LED bulb, pre-wired driver, and wire nuts.
There are a lot of resources online for finding the equipment you need to do this conversion, but I found and opted for a kit from M4 Products. They have a variety of bulbs available depending on the brightness and color hue or warmth you are looking for.
Each bulb comes with a pre-wired driver and LED tube lights that use the existing fluorescent bulb sockets. They look just like the fluorescent tubes being replaced, so when the project is done, your Roadtrek will look just it did before, only you’ll be able to see more of it because it’s so much brighter inside!
Warm or Cool?
Ordering the correct warmth of bulb is important and completely up to personal preference — options generally include Warm White, Natural White and Cool White. I opted for Warm White bulbs, which have a slightly yellow and warmer hue, for the light fixture over our couch/bed. The Warm White bulb colors are reminiscent of older incandescent bulbs than the starker, whiter colors associated with LEDs.
For the two light fixtures in the aisle, we went with Natural White, which is the middle-of-the-road in brightness and warmth. They are more of a white, cool hue and provide a brighter light than Natural White. The Cool White bulbs are brighter and whiter still, but I figured we weren’t planning to do surgery in our Roadtrek and something that bright in such a small space might actually be uncomfortable.
Below is a series of photos of my retrofit. Remember, this is for a 2008 Roadtrek 190 Popular, so your vehicle’s fixtures and how they are attached might be different. The total time for me on this project was about two and a half hours. My wife, Jessi, assisted and having a third or fourth hand to hold onto a light fixture while working on the rewiring is a big help. We weren’t in any desire to rush and the first fixture took a lot longer than the others because I had to follow directions a lot more closely the first time through. Also, anytime I’m cutting something in the Roadtrek, I make sure I’ve read instructions very closely!
Before you start, make sure that — in addition to your new bulbs and drivers — you have a #1 Robertson screwdriver (for those strange but effective square-headed screws Roadtrek loves to use), as well as wire cutters, a wire stripper and electrical tape. Also, and I can’t stress this enough, do not forget to ensure your coach batteries are switched off and your vehicle is not plugged into shore power. You are dealing with an electrical fixture and the only way to do that safely is to make sure there is no electricity flowing to it.
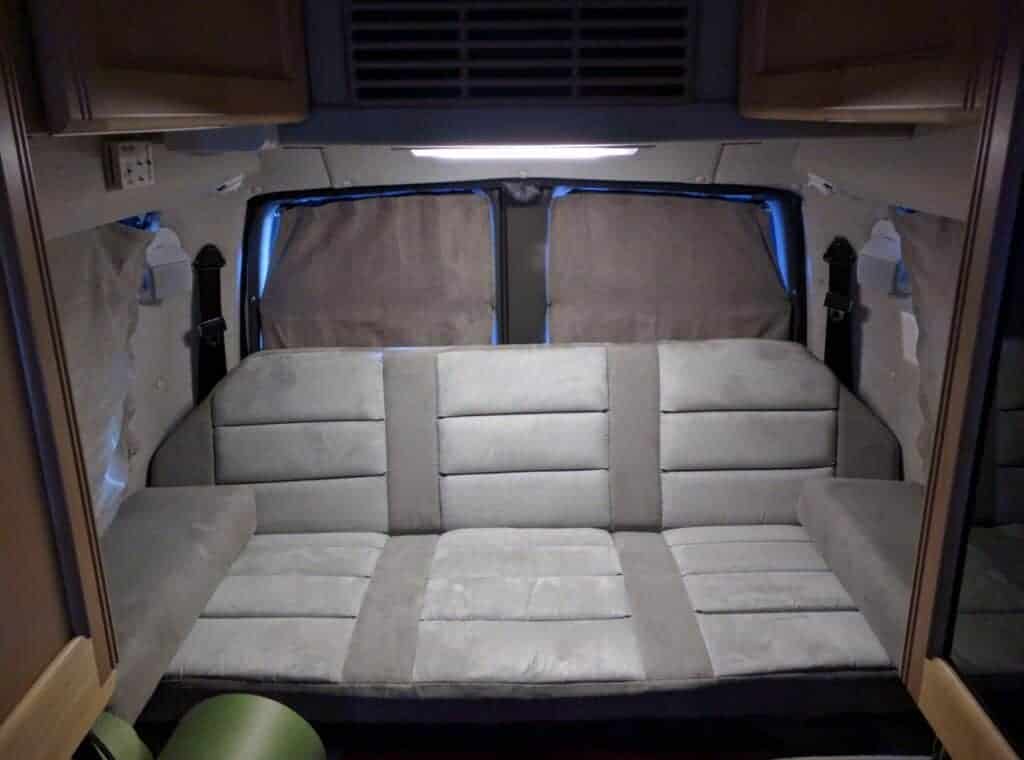
The “Before”

To the right is a “before” picture of the original fluorescent tubes on over our couch/bed. One thing to notice is that the light is brightest in the center of the couch, but it fades as you move to the outside corners. Also notice how the thermostat on the upper left wall is mostly in shadow. The lighting here and in the aisle always struck me as relatively bright but still lacking somehow. Also, the tubes were burning 8 watts each and our new LEDs will burn only 4 watts each.
More light for less power is a big deal when you’re living off of batteries!
Do you have a list of the part numbers you bought from M4? I have a 2008 RS and all the lights look the same, but the site is confusing, not sure if you still have your order list but that would be great to see! Thank you!
Hello!
I’m not sure if you’re looking to replace the small lights or the tubes, but here is what we used:
T5-Tube-NW Natural White 12″ T-5 LED Tube Light 4500k is what we used to replace the florescent tubes.
For the smaller lights, it is the G4/T3 flat disc bulbs that we used. They come in side-pin and rear-pin configurations, so check your existing bulbs to see which orientation you need for those fixtures.
Good luck!
Ari